How to Prepare Soil for Planting: The Ultimate Spring Garden Guide
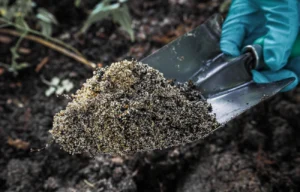
Table of Contents
Spring is knocking on your door, and your garden is calling. You'll want to start planting those tomatoes and sweet peppers soon. One significant step separates thriving gardens from disappointing ones: learning to prepare soil to plant.
Your soil is the foundation of everything that grows in your garden. You might be working out how to start a vegetable garden from scratch or refreshing existing beds. Either way, preparing soil to plant makes all the difference to your harvest.
This blog post will walk you through everything you need to know about preparing soil to plant vegetables. We'll cover understanding what's already in your ground and the finishing touches before your first seeds go in. Ready to give your plants the best possible start?
Understanding Your Soil Before You Start
You need to know what you're working with before you prepare soil to plant a garden. The simple squeeze test gives you instant answers. Grab a handful of moist soil and squeeze it in your palm. A tight, hard ball indicates clay soil. Clay holds water and nutrients but drains poorly and challenges root vegetables. A ball with a cakey consistency that crumbles at the time you poke it means you have loam or silty soil, which contains good organic matter and nutrient levels. Soil that collapses easily signals sandy soil. It drains quickly but doesn't deal very well with retaining nutrients. Pale soil with white chunks suggests chalky soil with a pH of 7 or more.
Testing drainage matters just as much. Dig a hole 12 inches deep and wide, fill it with water, let it drain, then refill and measure. Water draining in 5 to 15 minutes indicates good drainage, whilst 16 to 60 minutes shows adequate drainage if at least 1 inch drains per hour. More than 6 hours signals poor drainage unsuitable for most plants.
Clay soil works brilliantly with no-dig methods. Worms and soil organisms improve its structure naturally and provide excellent nutrient and moisture retention. Dense, firm soil supports plant stems better than loose soil.
How to Prepare Soil for Planting Vegetables Step-by-Step
Clear your beds before you begin any digging. Pull weeds by hand when soil is moist and remove the whole root system to prevent regrowth. Debris like fallen leaves, branches and stones should be raked away. Diseased plant material must be burned rather than composted to avoid spreading pathogens.
Dig to a depth of 37.5-45cm (15-18in) and incorporate organic material as you work. Deep tilling to 12-15 inches breaks up hardpan layers for new beds or ground that is compacted badly. A garden fork works better than a spade for this task. The fork loosens soil without inverting layers and preserves the soil structure that took years to develop.
A 5cm thick layer of well-rotted compost, farmyard manure or leafmould should be spread over the surface. Apply 5-10kg per square metre as a general rule. Fork this organic matter into the top few inches. Take care not to disturb deeper layers too much. Fresh manure should be avoided for root crops like carrots and parsnips as it causes forked, twisted growth.
Unite the soil surface by treading lightly or tapping with the back of a rake. This removes large air pockets without compressing soil structure. Water well, then water again several hours later to eliminate remaining air gaps. Wait at least one month before planting if you've added fresh manure or uncomposted materials.

Finishing Touches and Planting Your Garden
Once your beds are prepared, apply mulch before planting. Lay a 5cm layer of organic material across moist soil. You can increase this to 7.5cm to suppress weeds better. This locks moisture into the ground and reduces evaporation during hot periods. Water really well before mulching to trap existing moisture in the soil.
Direct sowing follows a simple rule: plant seeds at a depth two to four times their width. Tiny seeds like lettuce need only 1/4 inch depth. Larger beans and squash go 1-2 inches deep. Create shallow drills with a hoe or stick and water the base of each drill. Then sow seeds at packet-recommended spacing. Cover with soil and firm using your rake's back. Water again with a fine spray to avoid disturbing seeds.
Plan crop rotation now to prevent disease build-up and nutrient depletion. Divide your plot into four sections and rotate vegetables each year. Group legumes together (peas and beans), brassicas (cabbages and kale), potatoes with tomatoes, and roots with onions. Test pH levels in each bed. You want 6.5 to 7. If soil proves too acidic, add lime and follow packet instructions. Too alkaline requires compost and manure to decrease pH.
Water seedlings every third day until established.
Conclusion
You now have everything you need to prepare your soil and set your spring garden up for success. Take the time to understand your soil type and work in quality organic matter. Follow the preparation steps outlined above. The effort you invest now will pay dividends at harvest time. Your plants will reward proper soil preparation with stronger growth and better yields throughout the season. Get out there and start preparing those beds!
Key Takeaways
Master these essential soil preparation techniques to transform your spring garden from average to exceptional, ensuring healthier plants and abundant harvests.
• Test your soil type with the squeeze test and check drainage by timing water absorption in a 12-inch hole to understand what you're working with.
• Clear weeds and debris first, then dig 15-18 inches deep using a garden fork to loosen soil without destroying natural structure.
• Add 5cm of well-rotted compost or manure per square metre, working it into the top few inches for optimal nutrient availability.
• Apply mulch after planting and plan crop rotation across four sections to prevent disease build-up and maintain soil health long-term.
• Plant seeds at depths two to four times their width and water thoroughly before mulching to lock moisture into prepared beds.
Proper soil preparation is the foundation of gardening success. Invest time in these steps now, and your plants will reward you with stronger growth, better yields, and fewer problems throughout the growing season.
FAQs
Q1. What should I do to prepare my garden soil in spring? Start by testing your soil's pH levels and checking its texture using the squeeze test. Then dig the soil to loosen it, incorporate organic matter such as well-rotted compost or manure at 5-10kg per square metre, and remove any weeds and debris before planting.
Q2. What common mistakes should I avoid when preparing soil for spring planting? Avoid working with soil that's too wet, as this damages its structure. Don't plant warm-season crops too early before the soil has warmed sufficiently, and ensure you wait at least one month after adding fresh manure before planting to prevent root damage.
Q3. What's the best material to add to soil before planting vegetables? Well-rotted organic matter is ideal, including compost, farmyard manure, leafmould, or mushroom compost. Apply a 5cm layer and work it into the top few inches of soil. Avoid fresh manure for root crops as it causes forked growth.
Q4. How deep should I plant seeds in prepared soil? Plant seeds at a depth two to four times their width. Small seeds like lettuce need only 1/4 inch depth, whilst larger seeds such as beans and squash should go 1-2 inches deep. Water the drill base before sowing and firm gently afterwards.
Q5. Should I remove all leaves and mulch when preparing beds for spring? Don't remove everything—some organic material benefits soil health. Clear away diseased plant material and excessive debris, but leave some mulch to protect soil structure. After planting, apply fresh mulch at 5-7.5cm depth to retain moisture and suppress weeds.